
To help you with how to sand a car before painting, we have prepared the best guide for you.
You may want to breathe new life into your car and make it look like new. You can do this by having it painted in a workshop but, before painting the car, you have to sand your car, let us find out here how to do it properly?
“Sanding A Car” – What Does It Mean?
Sanding a car involves many stages of sanding to get smooth, straight, and ready to paint surface. The sanding process not only removes the old paint from the car, but it also allows to remove oxide layers that have formed in it.
During sanding, it is not necessary that all the vehicle paint is removed, what is required is to leave the surface level so that the new paint has an even grip.
If a car has been poorly sanded before painting, there is a risk that it will not adhere. So, when it dries it will come off the vehicle and will remain as a flake.
What Happens If I Get The Wrong Sandpaper?
Using a sandpaper that is not suitable for the vehicle will cause a poor finish. Mainly it causes what is called: “sanding marks”.
These are unsightly stripes whose shape varies depending on whether a bad manual process or a tool has been carried out. To avoid this problem, coarse-grained sandpaper should not be used, but extra fine sandpaper.
It is further recommended that the final sanding be done with a rotary machine. If the mistake of using coarse grit sandpaper has been made and the defect has been noticed after the painting process.
This can be corrected by sanding with the extra-fine grit, then the affected paint layers must be replaced.
How To Sand A Car Before Painting?
Would you like to learn how to sand a car before painting? Follow the advice that we will give you below and you will achieve a professional change in your vehicle.
Instructions For A Professional Finish
If you are ready to sand and paint a car, make that change of paint that your vehicle deserves so much. Follow these simple instructions on how to sand and paint a car like a professional.
It should be noted that the most important process when painting your car is sanding. Since the way it is done, it will be the result that we will have.
That is why special attention should be paid when we carry out this work.
How To Achieve A Correct Sanding
First of all, the most practical way to do a perfect sanding is to use sandpaper. These provide a perfectly smooth finish.
Many workshops have equipment and tools that make sanding quick and easy. However, they combine this, with manual sanding; because there are curved parts where the sander does not reach.
Likewise, to finish off, doing it manually, those areas that may be rough are detected by touch.
Let’s Talk About Sandpaper
There are all kinds of sandpaper and they range from the finest to the thickest. For this, a numbering system is established where the higher the number, the finer the grain.
Otherwise, the smallest number will be thicker. Coarse sandpapers are suitable for rough surfaces, removing paint and rust residues.
Coarse sandpaper is considered to be those that go from number 80 to the smallest such as 12. Medium or intermediate grit sandpaper helps smooth parts where coarse sandpaper has been used.
They are obtained from 280 to number 100.
Finally, there are the fine sandpaper or fine grain. They are ideal for achieving very smooth finishes. Especially, to achieve excellent finishes in the painting process.
They are found from 320, 260, 400, 500, and 600. And there are extra-fine ones, to smooth out already painted surfaces. For this, you need the 800, 1000, 2000 and 2500.
We have already talked about sandpaper and its types. Now to start the process of how to sand and paint a car. The first thing is to remove the layers of lacquer and paint.
If possible, use a grinding wheel to strip the body. Otherwise, do it manually even if it takes longer. During this first sanding, paint is removed, but also rusty areas.
It is noteworthy that it is not necessary to remove the paint completely, only the topcoats to match the surface. And open the pore so that the new layers of paint can adhere.
When finished, completely wash the car with soap and water to remove all dust residues. Double-check that there are no dents or cracks that need to be repaired.
Table could not be displayed.
In this opposite case, apply putty to solve the problem and match the putty with intermediate sandpaper. A 280-grain one will be very useful and preferably water, with which you will have to get wet when sanding.
Finish with 320 grit fine sandpaper to achieve a smooth surface to the touch.
Preparing The Car
- If you already have the car completely sanded and caulked, now it is time to prepare it for painting. Wash again with soap and water, if possible, with a degreaser to remove any residue. Dry with a clean cloth and proceed to protect the surfaces that you do not want to stain.
- Next in the process of how to sand and paint a car is masking. This should be done with paper or plastic and fastened with body tape. It covers well the areas that can be damaged and if it is possible to disassemble the parts such as antennas, plates, plastics, and bumpers.
- Then, place a thin layer of gray background with the help of the compressor. Apply with reciprocating movements until completely covered.
- Wait to dry for 30 minutes to 1 hour and check if there are any details that can be repaired. Wipe down 600 grit fine sandpaper to smooth the surface.
- Use water during the process for a better glide and finish. Wash again and mop dry. Apply a second coat of primer and wait 24 hours before painting.
Finally To Paint
At the time of painting, prepare the paint according to the manufacturer’s instructions, plus 20% thinner. The purpose is to create an extra-thin first coat so that the next one will adhere better.
Quickly apply it with the gun perpendicular to the surface. It does not require it to be perfect, although it takes care that there are no leaks.
Wait 25 to 30 minutes to dry before applying a second coat. Apply up to 3 layers so that the car is well covered. Let dry a minimum of 6 to 8 hours and pass 1000 sandpaper to smooth the entire surface.
Wash with soap and water and then dry with lint-free material.
Finally, apply the first coat of varnish. It is recommended to do it in a closed place and free of dust. Since it is susceptible to sticking to the body while it is fresh. This process must be very clean, fast, and even so that it has a quality finish.
After 24 hours, apply a body paste and polish the entire car to give a greater shine. Remove all masks and wash to remove any dirt from the paste or dust.
Table could not be displayed.
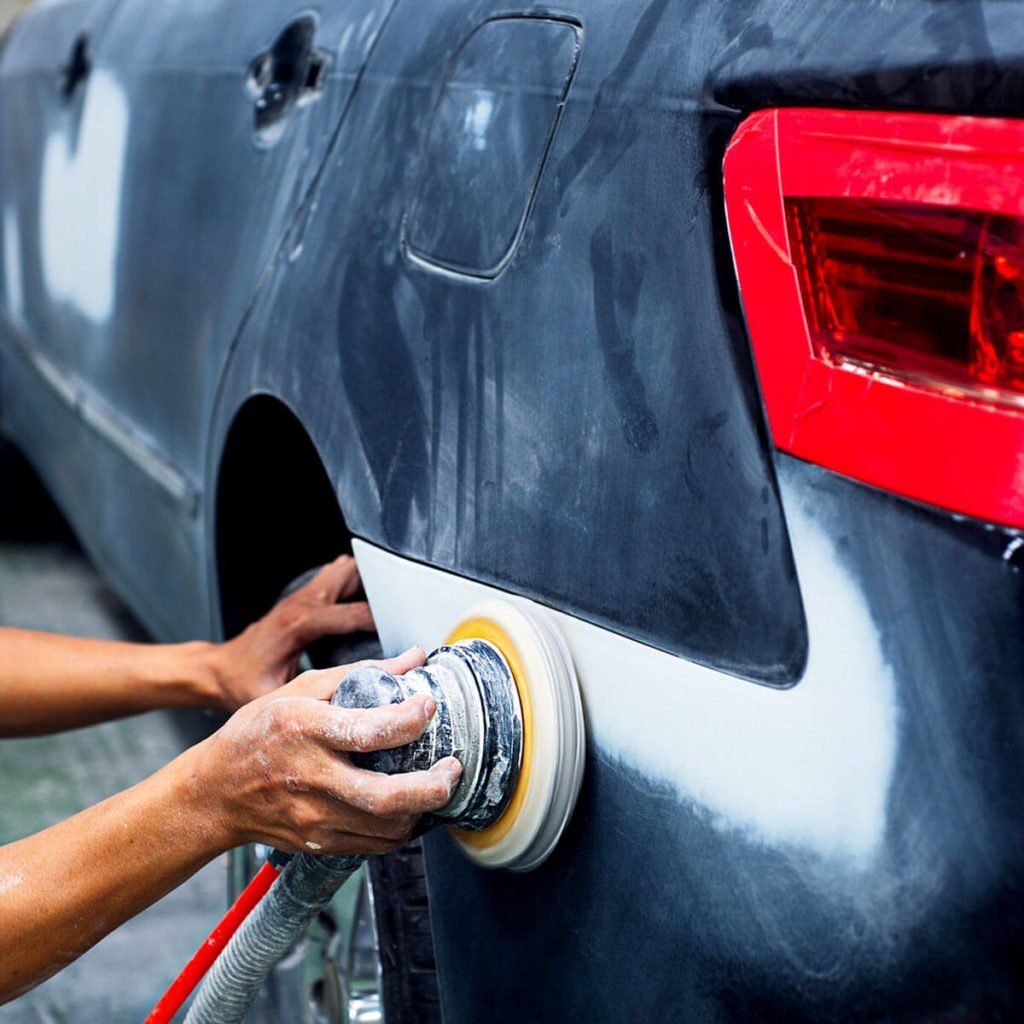
Suitable Car Sanding Tools: Auto and Manuel
For car sanding, it is necessary to have sanding sheets. Ideally, they should be from 2000 grains onwards and choose between the type of “sandpaper”.
Sandpaper can be used dry or wet and achieve a better finish in this type of action. The tools for sanding will vary if you want to do the work by hand or if you will use tools.
Many prefer to use emery for the process, so this is much faster. Remember that if you will use this tool, you must also have protection implements for your safety.
Putty application is necessary when the car surface is not smooth. This will make it appear more uniform, but after use, it will be necessary to continue with the sanding process.
Regarding the choice of sandpaper, you can start with 80-grit sandpaper to finish with finer grit sandpaper in the process and thus achieve a better finish.
The finest sandpaper, used at the end will allow the car to have a perfect finish. Although it seems that the sanding has left everything uniform, it can still be better.
At this time, the primer should be used, especially in areas where, after sanding, metal has appeared. Then proceed with the rig. This is used on what has been putty, thus achieving a more professional finish.
Table could not be displayed.
The rig must dry, the time will depend on the manufacturer. After it is dry, it is sanded again with a finer grit abrasive. Many even use sandpaper up to P-1000.
After sanding, the residue must be removed. This is accomplished with two elements: a blowing machine and a degreasing product.
Conclusion
We hope that these simple yet complete guide on how to sand a car before painting will be helpful.
Take the above process and tips into consideration so that you don’t get more expensive later! Do not forget to wash the car well after sanding so that there is no residue.